 NICE-SLAM: Neural Implicit Scalable Encoding for SLAM
Zihan Zhu*
·
Songyou Peng*
·
Viktor Larsson
·
Weiwei Xu
·
Hujun Bao
Zhaopeng Cui
·
Martin R. Oswald
·
Marc Pollefeys
(* Equal Contribution)
CVPR 2022

NICE-SLAM produces accurate dense geometry and camera tracking on large-scale indoor scenes.
(The black / red lines are the ground truth / predicted camera trajectory)
Table of Contents
-
Installation
-
Visualization
-
Demo
-
Run
-
iMAP*
-
Evaluation
-
Acknowledgement
-
Citation
-
Contact
## Installation
First you have to make sure that you have all dependencies in place.
The simplest way to do so, is to use [anaconda](https://www.anaconda.com/).
You can create an anaconda environment called `nice-slam`. For linux, you need to install **libopenexr-dev** before creating the environment.
```bash
sudo apt-get install libopenexr-dev
conda env create -f environment.yaml
conda activate nice-slam
```
## Visualizing NICE-SLAM Results
We provide the results of NICE-SLAM ready for download. You can run our **interactive visualizer** as following.
### Self-captured Apartment
To visualize our results on the self-captured apartment, as shown in the teaser:
```bash
bash scripts/download_vis_apartment.sh
python visualizer.py configs/Apartment/apartment.yaml --output output/vis/Apartment
```
**Note for users from China:** If you encounter slow speed in downloading, check in all the `scripts/download_*.sh` scripts, where we also provide the 和彩云 links for you to download manually.
### ScanNet
```bash
bash scripts/download_vis_scene0000.sh
python visualizer.py configs/ScanNet/scene0000.yaml --output output/vis/scannet/scans/scene0000_00
```
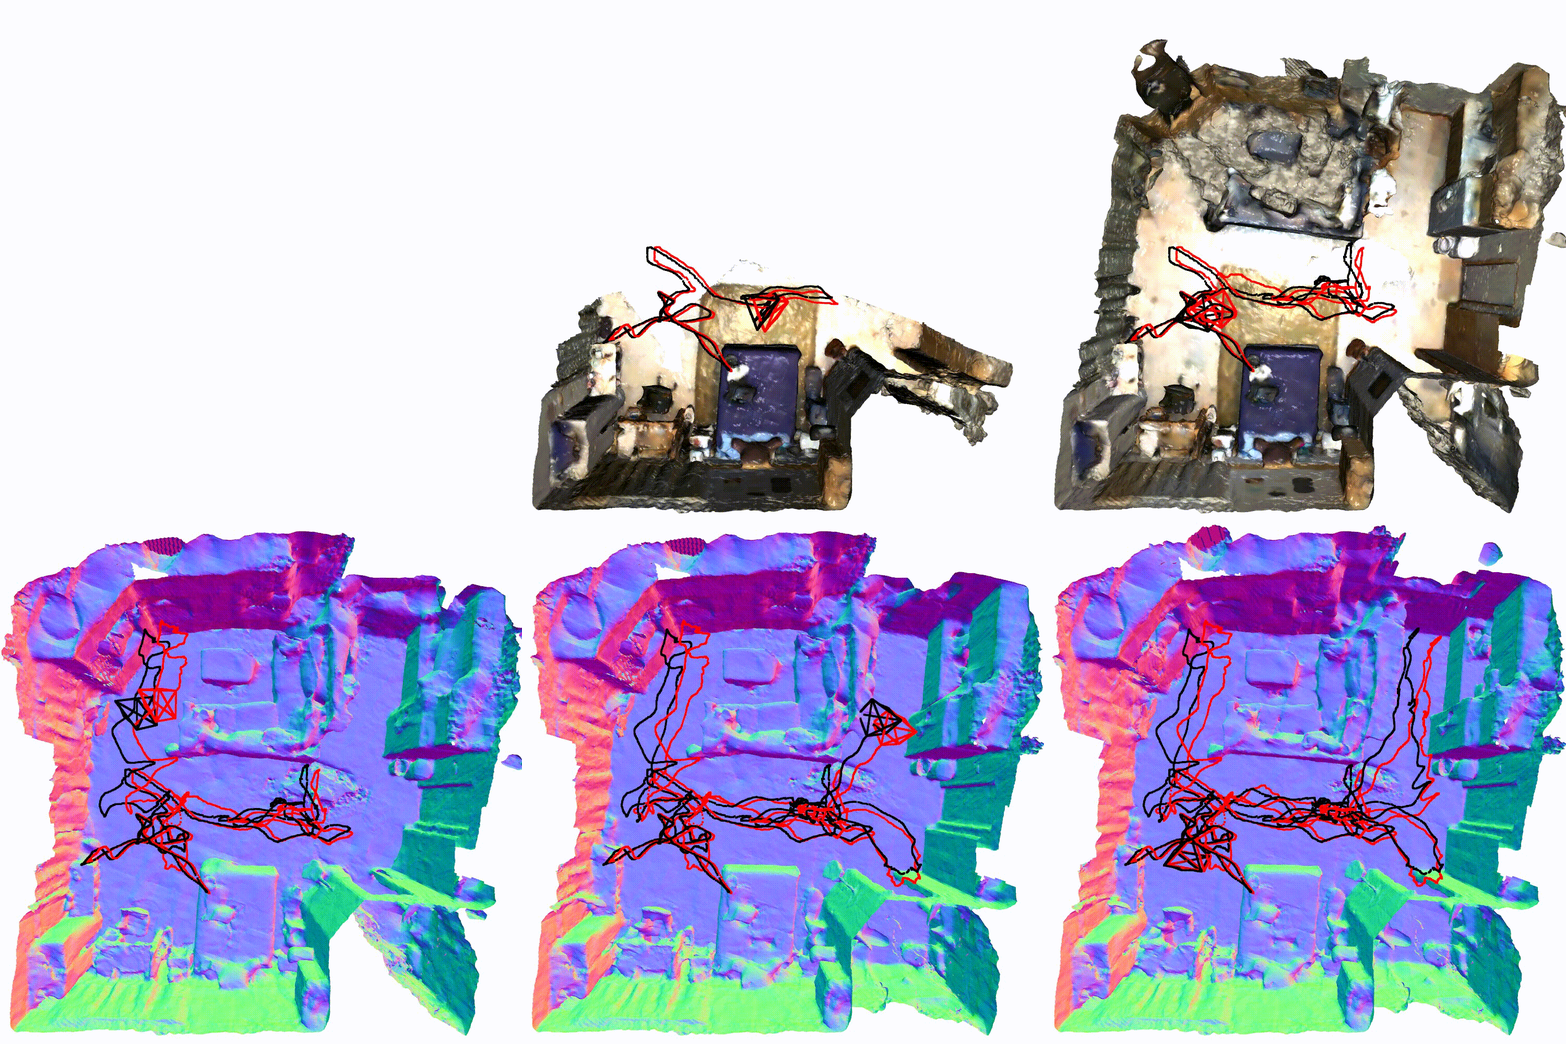
You can find the results of NICE-SLAM on other scenes in ScanNet [here](https://cvg-data.inf.ethz.ch/nice-slam/vis/scannet/).
### Replica
```bash
bash scripts/download_vis_room1.sh
python visualizer.py configs/Replica/room1.yaml --output output/vis/Replica/room1
```
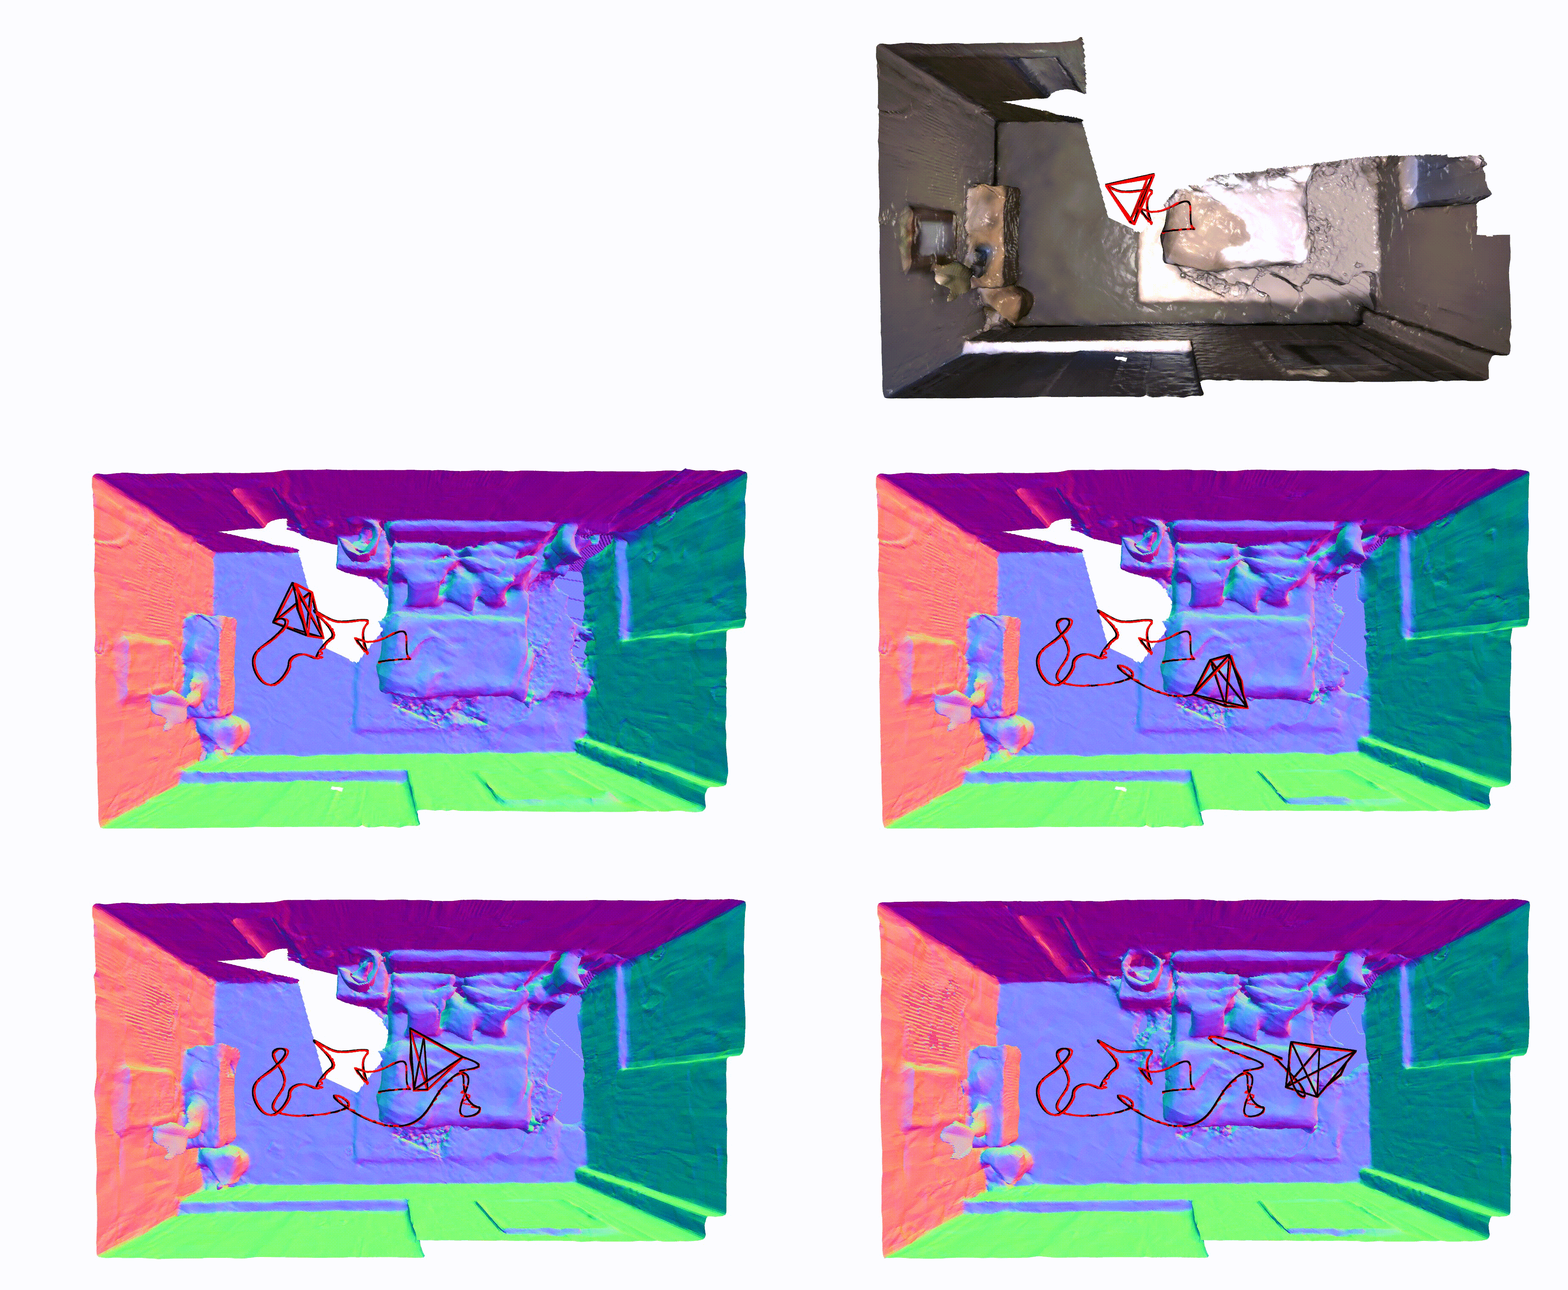
[Directory structure of ScanNet (click to expand)]
DATAROOT is `./Datasets` by default. If a sequence (`sceneXXXX_XX`) is stored in other places, please change the `input_folder` path in the config file or in the command line.
```
DATAROOT
└── scannet
└── scans
└── scene0000_00
└── frames
├── color
│ ├── 0.jpg
│ ├── 1.jpg
│ ├── ...
│ └── ...
├── depth
│ ├── 0.png
│ ├── 1.png
│ ├── ...
│ └── ...
├── intrinsic
└── pose
├── 0.txt
├── 1.txt
├── ...
└── ...
```
Once the data is downloaded and set up properly, you can run NICE-SLAM:
```bash
python -W ignore run.py configs/ScanNet/scene0000.yaml
```
### Replica
Download the data as below and the data is saved into the `./Datasets/Replica` folder. Note that the Replica data is generated by the authors of iMAP, so please cite iMAP if you use the data.
```bash
bash scripts/download_replica.sh
```
and you can run NICE-SLAM:
```bash
python -W ignore run.py configs/Replica/room0.yaml
```
The mesh for evaluation is saved as `$OUTPUT_FOLDER/mesh/final_mesh_eval_rec.ply`, where the unseen regions are culled using all frames.
### TUM RGB-D
Download the data as below and the data is saved into the `./Datasets/TUM-RGBD` folder
```bash
bash scripts/download_tum.sh
```
Now run NICE-SLAM:
```bash
python -W ignore run.py configs/TUM_RGBD/freiburg1_desk.yaml
```
### Co-Fusion
First, download the dataset. This script should download and unpack the data automatically into the `./Datasets/CoFusion` folder.
```bash
bash scripts/download_cofusion.sh
```
Run NICE-SLAM:
```bash
python -W ignore run.py configs/CoFusion/room4.yaml
```
### Use your own RGB-D sequence from Kinect Azure
[Details (click to expand)]
1. Please first follow this [guide](http://www.open3d.org/docs/release/tutorial/sensor/azure_kinect.html#install-the-azure-kinect-sdk) to record a sequence and extract aligned color and depth images. (Remember to use `--align_depth_to_color` for `azure_kinect_recorder.py`)
DATAROOT is `./Datasets` in default, if a sequence (`sceneXX`) is stored in other places, please change the "input_folder" path in the config file or in the command line.
```
DATAROOT
└── Own
└── scene0
├── color
│ ├── 00000.jpg
│ ├── 00001.jpg
│ ├── 00002.jpg
│ ├── ...
│ └── ...
├── config.json
├── depth
│ ├── 00000.png
│ ├── 00001.png
│ ├── 00002.png
│ ├── ...
│ └── ...
└── intrinsic.json
```
2. Prepare `.yaml` file based on the `configs/Own/sample.yaml`. Change the camera intrinsics in the config file based on `intrinsic.json`. You can also get the intrinsics of the depth camera via other tools such as MATLAB.
3. Specify the bound of the scene. If no ground truth camera pose is given, we construct world coordinates on the first frame. The X-axis is from left to right, Y-axis is from down to up, Z-axis is from front to back.
4. Change the `input_folder` path and/or the `output` path in the config file or the command line.
5. Run NICE-SLAM.
```bash
python -W ignore run.py configs/Own/sample.yaml
```
**(Optional but highly Recommended)** If you don't want to specify the bound of the scene or manually change the config file. You can first run the Redwood tool in [Open3D](http://www.open3d.org/) and then run NICE-SLAM. Here we provide steps for the whole pipeline, beginning from recording Azure Kinect videos. (Ubuntu 18.04 and above is recommended.)
1. Download the Open3D repository.
```bash
bash scripts/download_open3d.sh
```
2. Record and extract frames.
```bash
# specify scene ID
sceneid=0
cd 3rdparty/Open3D-0.13.0/examples/python/reconstruction_system/
# record and save to .mkv file
python sensors/azure_kinect_recorder.py --align_depth_to_color --output scene$sceneid.mkv
# extract frames
python sensors/azure_kinect_mkv_reader.py --input scene$sceneid.mkv --output dataset/scene$sceneid
```
3. Run reconstruction.
```bash
python run_system.py dataset/scene$sceneid/config.json --make --register --refine --integrate
# back to main folder
cd ../../../../../
```
4. Prepare the config file.
```bash
python src/tools/prep_own_data.py --scene_folder 3rdparty/Open3D-0.13.0/examples/python/reconstruction_system/dataset/scene$sceneid --ouput_config configs/Own/scene$sceneid.yaml
```
5. Run NICE-SLAM.
```bash
python -W ignore run.py configs/Own/scene$sceneid.yaml
```
## iMAP*
We also provide our re-implementation of iMAP (iMAP*) for use. If you use the code, please cite both the original iMAP paper and NICE-SLAM.
### Usage
iMAP* shares a majority part of the code with NICE-SLAM. To run iMAP*, simply use `*_imap.yaml` in the config file and also add the argument `--imap` in the command line. For example, to run iMAP* on Replica room0:
```bash
python -W ignore run.py configs/Replica/room0_imap.yaml --imap
```
To use our interactive visualizer:
```bash
python visualizer.py configs/Replica/room0_imap.yaml --imap
```
To evaluate ATE:
```bash
python src/tools/eval_ate.py configs/Replica/room0_imap.yaml --imap
```
[Differences between iMAP* and the original iMAP (click to expand)]
#### Keyframe pose optimization during mapping
We do not optimize the selected keyframes' poses for iMAP*, because optimizing them usually leads to worse performance. One possible reason is that since their keyframes are selected globally, and many of them do not have overlapping regions especially when the scene gets larger. Overlap is a prerequisite for bundle adjustment (BA). For NICE-SLAM, we only select overlapping keyframes within a small window (local BA), which works well in all scenes. You can still turn on the keyframe pose optimization during mapping for iMAP* by enabling `BA` in the config file.
#### Active sampling
We disable the active sampling in iMAP*, because in our experiments we observe that it does not help to improve the performance while brings additional computational overhead.
For the image active sampling, in each iteration the original iMAP uniformly samples 200 pixels in the entire image. Next, they divide this image into an 8x8 grid and calculate the probability distribution from the rendering losses. This means that if the resolution of an image is 1200x680 (Replica), only around 3 pixels are sampled to calculate the distribution for a 150x85 grid patch. This is not too much different from simple uniform sampling. Therefore, during mapping we use the same pixel sampling strategy as NICE-SLAM for iMAP*: uniform sampling, but even 4x more pixels than reported in the iMAP paper.
For the keyframe active sampling, the original iMAP requires rendering depth and color images for all keyframes to get the loss distribution, which is expensive and we again did not find it very helpful. Instead, as done in NICE-SLAM, iMAP* randomly samples keyframes from the keyframe list. We also let iMAP* optimize for 4x more iterations than NICE-SLAM, but their performance is still inferior.
#### Keyframe selection
For fair comparison, we use the same keyframe selection method in iMAP* as in NICE-SLAM: add one keyframe to the keyframe list every 50 frames.
## Evaluation
### Average Trajectory Error
To evaluate the average trajectory error. Run the command below with the corresponding config file:
```bash
python src/tools/eval_ate.py configs/Replica/room0.yaml
```
### Reconstruction Error
To evaluate the reconstruction error, first download the ground truth Replica meshes where unseen region have been culled.
```bash
bash scripts/download_cull_replica_mesh.sh
```
Then run the command below (same for NICE-SLAM and iMAP*). The 2D metric requires rendering of 1000 depth images, which will take some time (~9 minutes). Use `-2d` to enable 2D metric. Use `-3d` to enable 3D metric.
```bash
# assign any output_folder and gt mesh you like, here is just an example
OUTPUT_FOLDER=output/Replica/room0
GT_MESH=cull_replica_mesh/room0.ply
python src/tools/eval_recon.py --rec_mesh $OUTPUT_FOLDER/mesh/final_mesh_eval_rec.ply --gt_mesh $GT_MESH -2d -3d
```
We also provide code to cull the mesh given camera poses. Here we take culling of ground truth mesh of Replica room0 as an example.
```bash
python src/tools/cull_mesh.py --input_mesh Datasets/Replica/room0_mesh.ply --traj Datasets/Replica/room0/traj.txt --output_mesh cull_replica_mesh/room0.ply
```
[For iMAP* evaluation (click to expand)]
As discussed in many recent papers, e.g. UNISURF/VolSDF/NeuS, manual thresholding the volume density during marching cubes might be needed. Moreover, we find out there exist scaling differences, possibly because of the reason discussed in [NeuS](https://arxiv.org/abs/2106.10689). Therefore, ICP with scale is needed. You can use the [ICP tool](https://www.cloudcompare.org/doc/wiki/index.php?title=ICP) in [CloudCompare](https://www.danielgm.net/cc/) with default configuration with scaling enabled.
## Acknowledgement
We adapted some codes from some awesome repositories including [convolutional_occupancy_networks](https://github.com/autonomousvision/convolutional_occupancy_networks), [nerf-pytorch](https://github.com/yenchenlin/nerf-pytorch), [lietorch](https://github.com/princeton-vl/lietorch), and [DIST-Renderer](https://github.com/B1ueber2y/DIST-Renderer). Thanks for making codes public available. We also thank [Edgar Sucar](https://edgarsucar.github.io/) for allowing us to make the Replica Dataset available.
## Citation
If you find our code or paper useful, please cite
```bibtex
@inproceedings{Zhu2022CVPR,
author = {Zhu, Zihan and Peng, Songyou and Larsson, Viktor and Xu, Weiwei and Bao, Hujun and Cui, Zhaopeng and Oswald, Martin R. and Pollefeys, Marc},
title = {NICE-SLAM: Neural Implicit Scalable Encoding for SLAM},
booktitle = {Proceedings of the IEEE/CVF Conference on Computer Vision and Pattern Recognition (CVPR)},
year = {2022}
}
```
## Contact
Contact [Zihan Zhu](mailto:zhuzihan2000@gmail.com) and [Songyou Peng](mailto:songyou.pp@gmail.com) for questions, comments and reporting bugs.